Python HTTP Request
This guide provides instructions for setting up a Python HTTP Request integration in your autobotAI account. By completing this setup, you'll be able to make API requests via Python-based automation within autobotAI.
What is the Python HTTP Request Integration For?
The Python HTTP Request integration enables automation workflows to interact with any external or internal API endpoints. This is particularly useful for:
- Posting or retrieving data from internal REST APIs
- Triggering external systems such as CI/CD pipelines, cloud services, or SaaS platforms
- Handling custom integrations that aren't available via native plugins
- Executing low-latency or dynamic operations in Python bots
Combined with autobotAI's agent routing feature, it also supports secure communication with private APIs that aren’t publicly accessible.
Prerequisites
Before setting up the Python HTTP Request integration, ensure the following:
- A valid API endpoint URL that you intend to call from autobotAI
- Any required authentication headers, such as bearer tokens or API keys, formatted as JSON
- If the target API uses a self-signed certificate, be prepared to disable SSL verification (optional)
- If the API is hosted on a private network, confirm that a compatible autobotAI agent is available to route the request internally
Integration Field Details
| Field | Required | Description |
|---|---|---|
| Alias | Yes | A meaningful name for the integration |
| Groups | Yes | The integration groups to which this integration should belong (used for organization) |
| API URL | Yes | The base API endpoint that will be used to perform HTTP operations |
| Ignore SSL | No | Whether to ignore SSL certificate validation (use true for self-signed certificates; defaults to false).Note: Must be set here — setting it in the action code may cause multiple values error. |
| Headers | Yes | A JSON-formatted object representing headers (e.g., {"Authorization": "Bearer token", "Content-Type": "application/json"})Note: These headers won’t be overridden by headers defined in the action code. |
| GET API Path for Testing | No | A relative path to send a test GET request to validate connectivity (e.g., /health or /status) |
| Route Through Agent | No | Whether to route the request through an agent to access internal/private APIs. Useful for services not exposed to the public internet |
Step-by-Step Guide
Step 1:
Navigate to the Integrations page by clicking on the Integrations menu. Then click the + Add Integration button at the top right.
Step 2:
From the list of available integrations under the Others section, select Python HTTP Request + Add to begin setup.
Step 3:
Fill the integration fields in the form.
➡️ Refer to Integration Field Details for field descriptions.
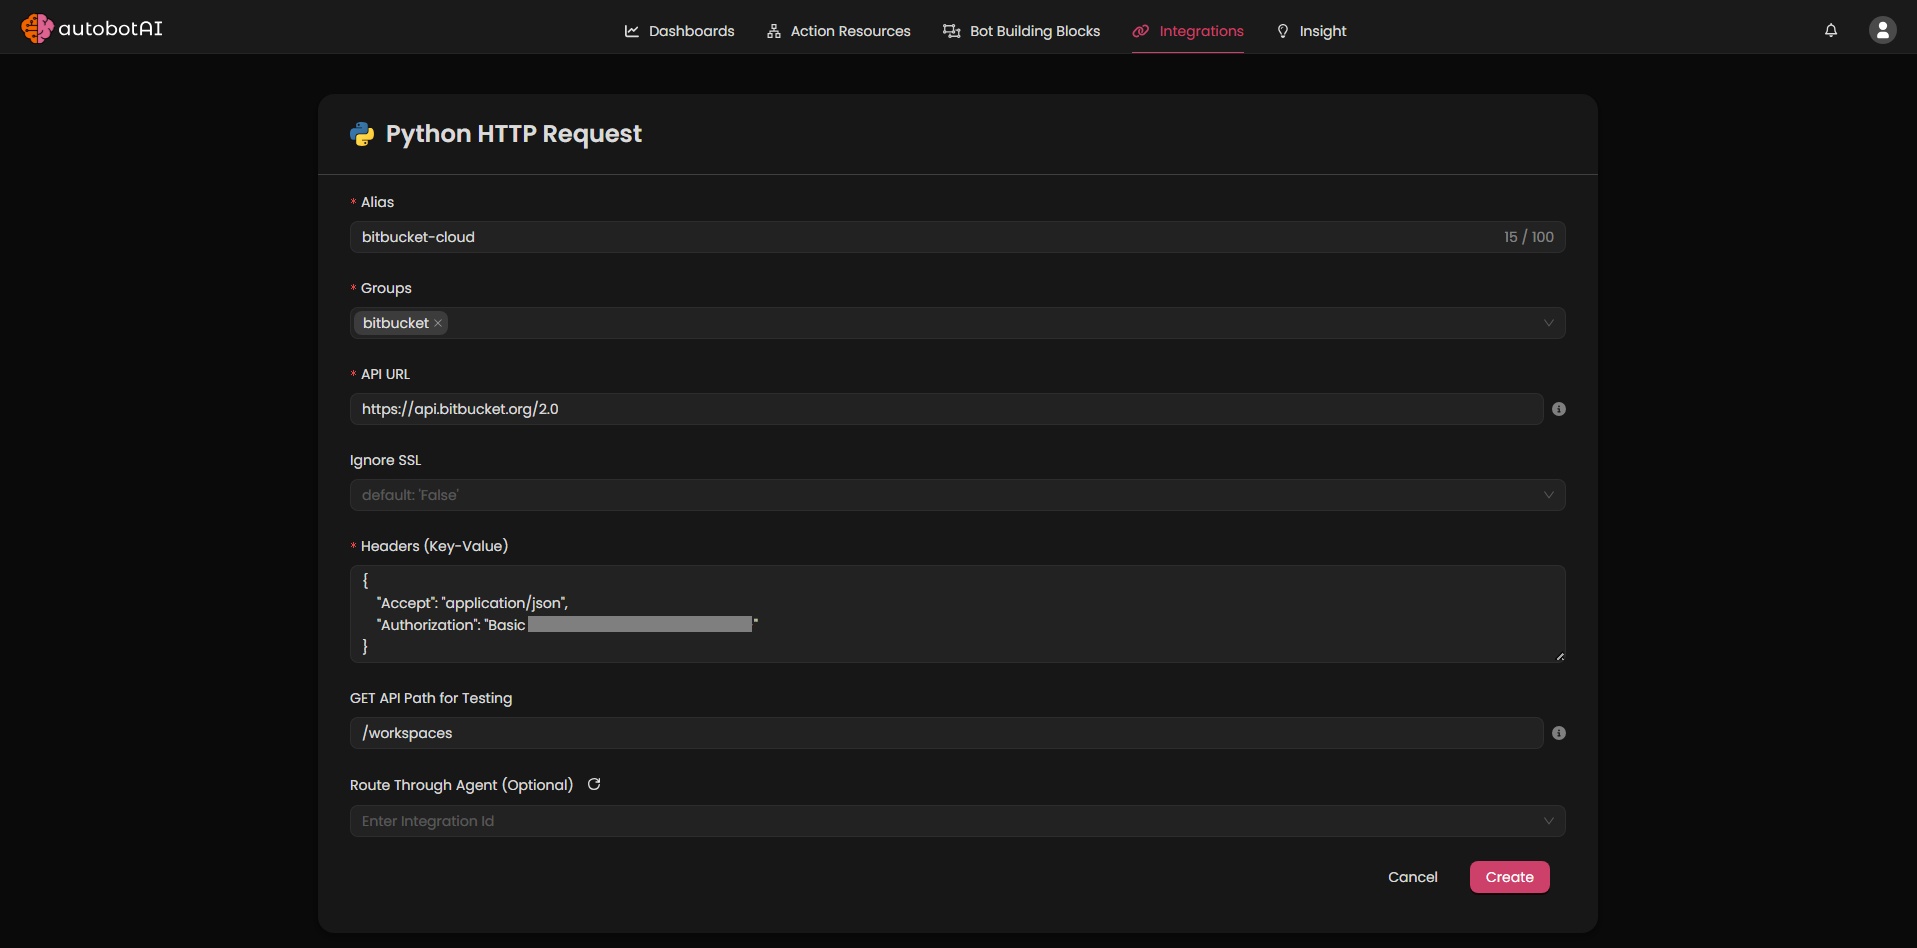
Note: The example shown above uses Bitbucket Cloud APIs for demonstration purposes.
Step 4: Test the Integration
Go to your newly created Python HTTP Request integration under Integrations. Click on the three-dot menu next to it, then select Test. This will trigger a request to the GET API Path for Testing, if provided, to verify the setup.
Sample Usage
Below is a sample Python code snippet you can use when creating a Python HTTP Request action in autobotAI. This demonstrates how to access the client object from context and make various types of HTTP requests.
Code Template
python# Import your modules here
import json
import traceback

def executor(context):
    """
    Executes provided Python code within integrations.

    Args:
        context (dict): Contains `params` (action parameters) and `clients` (integration clients).

    Returns:
        list: A list containing response or result data.
    """

    client = context["clients"]["python_http_requests"]

    # Example: POST request with JSON payload
    payload = {
        "name": "Example Integration",
        "type": "webhook",
        "config": {
            "url": "https://example.com/webhook",
            "method": "POST"
        }
    }

    response = client.request("POST", "/integrations", json=payload)

    return response.json()
Additional Examples
- GET Request
pythonresponse = client.request("GET", "/integrations")
print("GET /integrations:", response.status_code, response.json())
- GET Request with Query Parameters
pythonparams = {"status": "active"}
response = client.request("GET", "/integrations", params=params)
print("GET with query params:", response.status_code, response.json())
- GET with Custom Headers
pythoncustom_headers = {"X-Custom-Token": "abc123"}
response = client.request("GET", "/integrations", headers=custom_headers)
print("GET with custom headers:", response.status_code, response.json())
- POST Request with data= (form-encoded)
pythonform_data = "name=Test&type=webhook"
headers = {"Content-Type": "application/x-www-form-urlencoded"}
response = client.request("POST", "/integrations", data=form_data, headers=headers)
print("POST form data:", response.status_code, response.text)
- Error Handling Example
pythontry:
    bad_response = client.request("GET", "/non-existent-endpoint")
    bad_response.raise_for_status()
except Exception as e:
    print("Request failed:", e)
    print(traceback.format_exc())
Note: Always validate that your response handling logic and exception handling are suitable for your API’s expected behavior.