autobotAI Linux Agent
Overview
The autobotAI Linux Agent is part of a broad range of automation solutions from autobotAI, including No Code, Low Code, and Full Code options. While the Linux Agent itself supports comprehensive automation, it is particularly useful for interacting with command-line utilities to perform specific actions.
Linux Action Nodes offer a No Code experience, abstracting away the need for manual coding. These nodes empower users to quickly execute tasks leveraging AI, such as running AWS CLI commands or Ansible playbooks—allowing them to focus on outcomes instead of code. For more information on available actions, see About Linux Actions.
Prerequisites
- Linux Integration: Ensure you have the necessary integrations set up.
- Linux Instance: You will need a Linux instance running Ubuntu 22.04 or later. Currently, we only support Ubuntu systems.
- Minimum Requirements: A minimum instance type of
t2.microon AWS or an equivalent on other providers. - Privilege Mode: The agent service requires to run as root. Ensure you have the necessary permissions to install and operate the agent.
- Network Access:
- Ensure the host machine has internet access, specifically over port 443 (HTTPS).
- Purpose:
- To download the agent during setup.
- To allow the agent to function, as it cannot operate without internet connectivity.
Supported Platforms
The autobotAI Linux Agent supports the following architectures:
- Supported Architectures:
amd64(x86_64)arm64(AArch64)
How to Install the Agent?
To install and set up the autobotAI Linux agent, please follow the steps outlined below.
-
Add a New Linux Integration
- First, log in to autobotAI.
- Use this link to go to the autobotAI Linux integration page: Linux Integration.
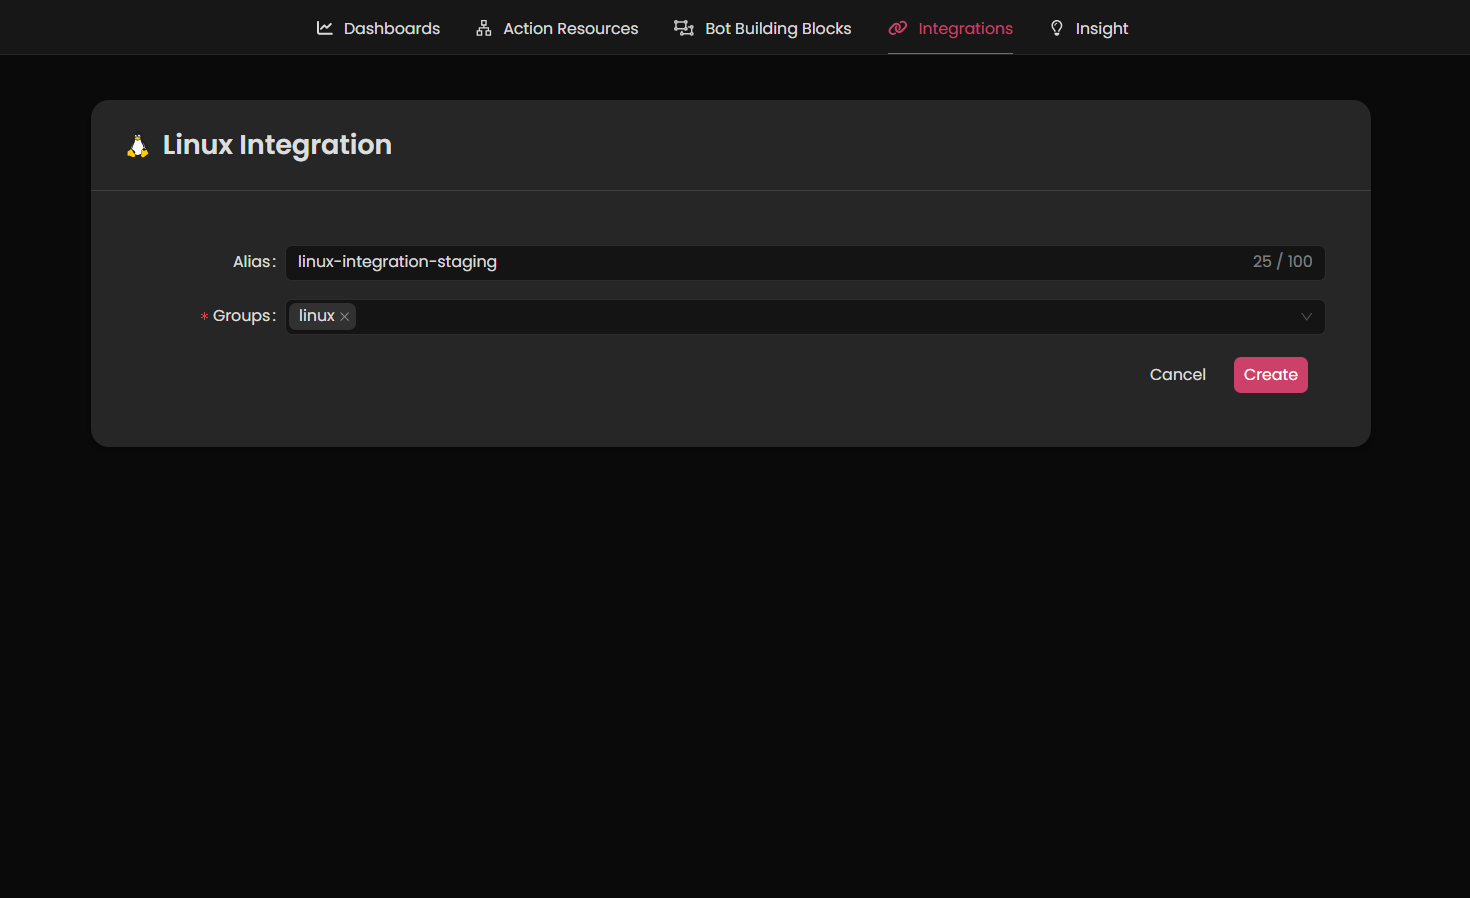
- Add a new Linux integration by providing the integration name and group, then click 'Create.'
-
Add an Agent
- On the next page, add an agent by providing a name in the designated field.
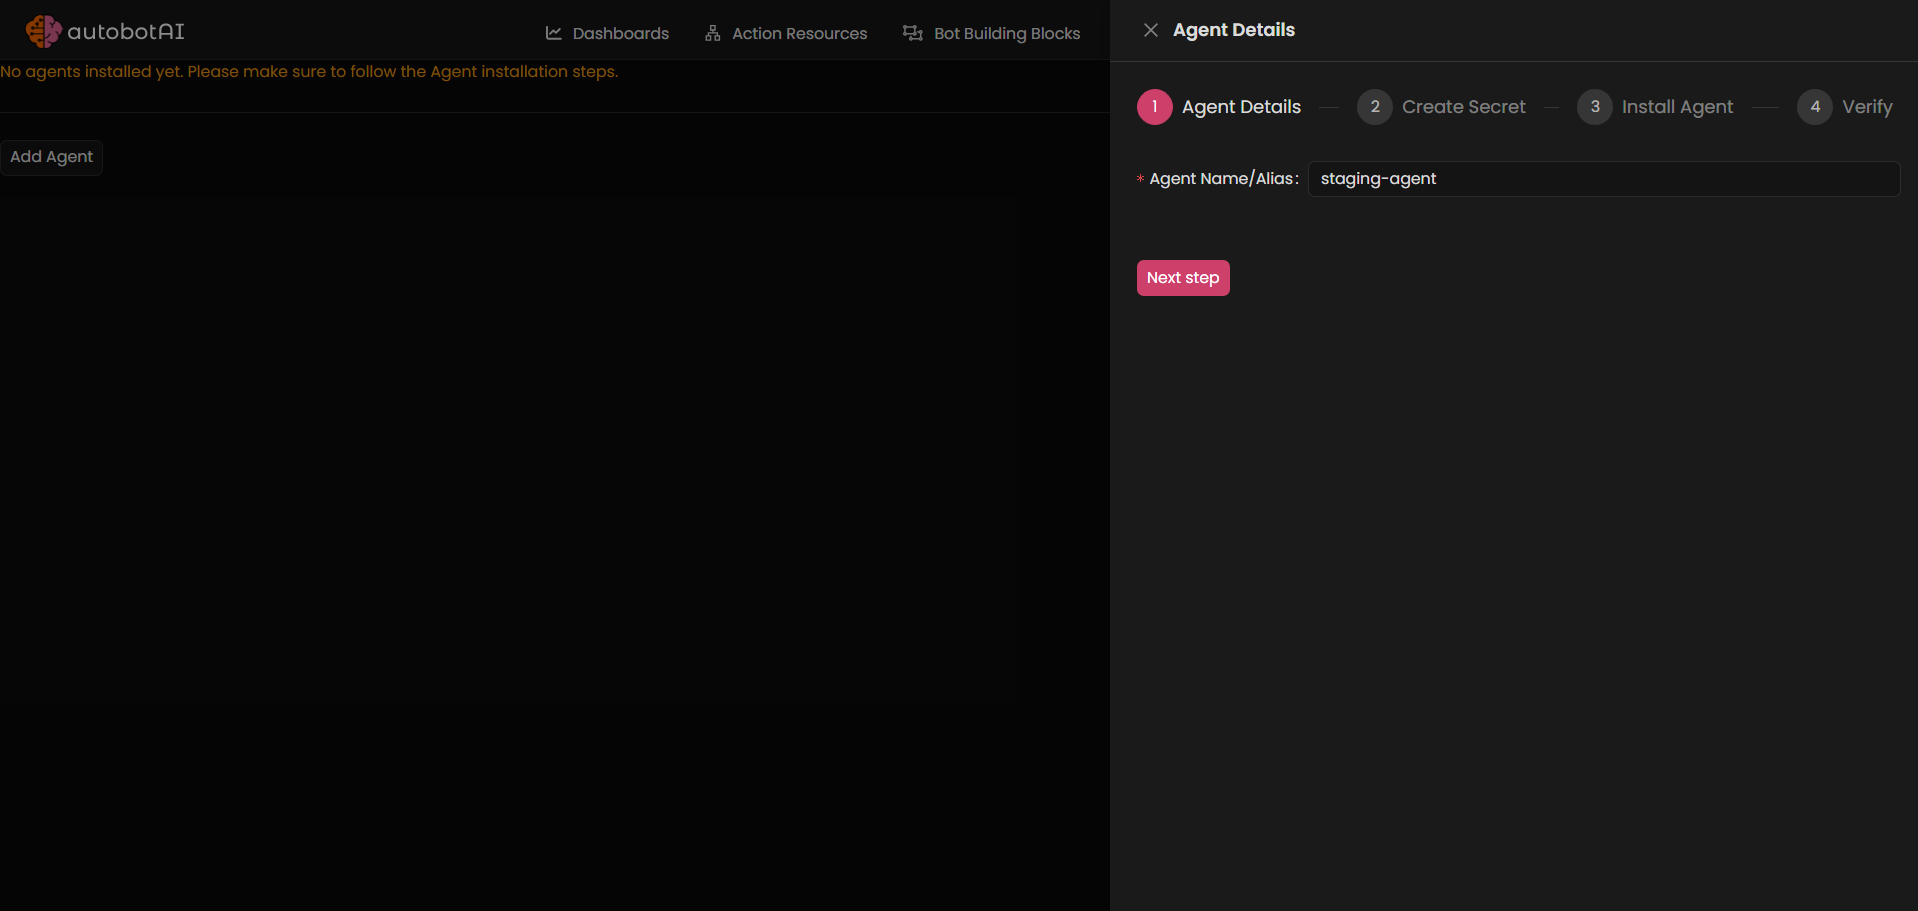
- On the next page, add an agent by providing a name in the designated field.
-
Generate Credentials
- Click "Next Step" to generate the credentials (API URL, Agent API Key, Agent ID) required for the agent. Copy these credentials to a secure location, as you will need them in the next step.
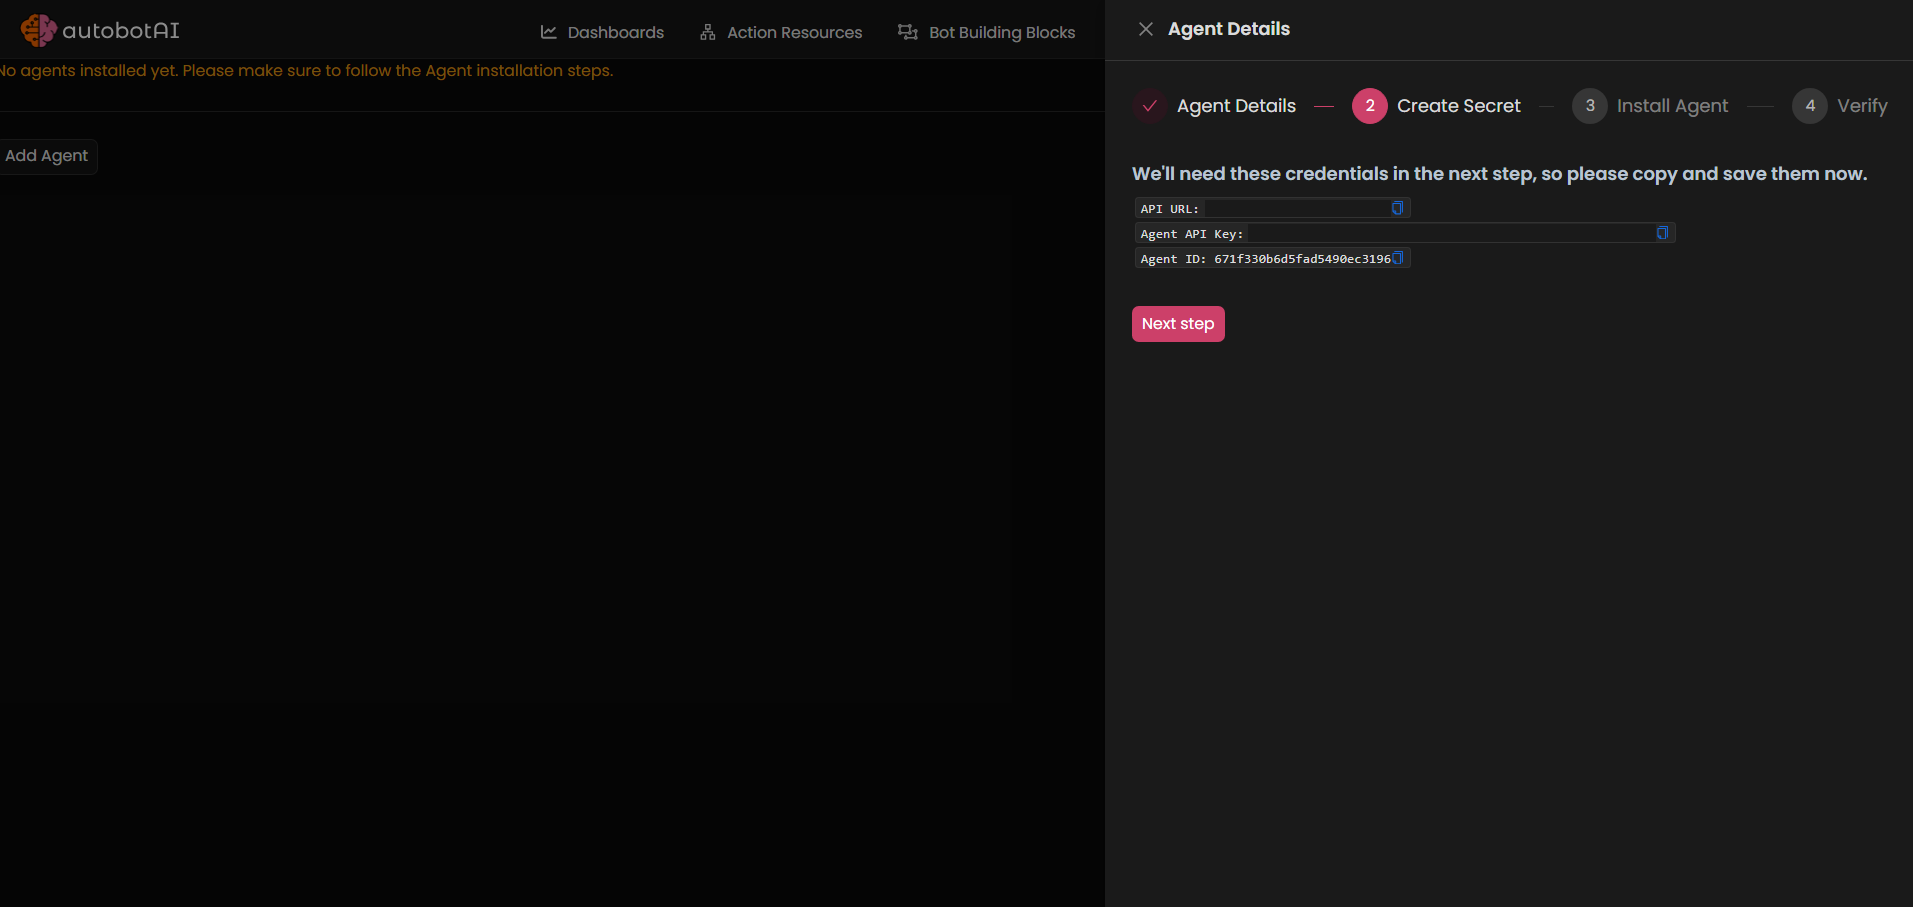
- Click "Next Step" to generate the credentials (API URL, Agent API Key, Agent ID) required for the agent. Copy these credentials to a secure location, as you will need them in the next step.
-
Get the Installation Command
- Click "Next Step." You will receive an agent installation link. Copy this link and paste it into the terminal on your target agent system. For more information, refer to the Prerequisites.
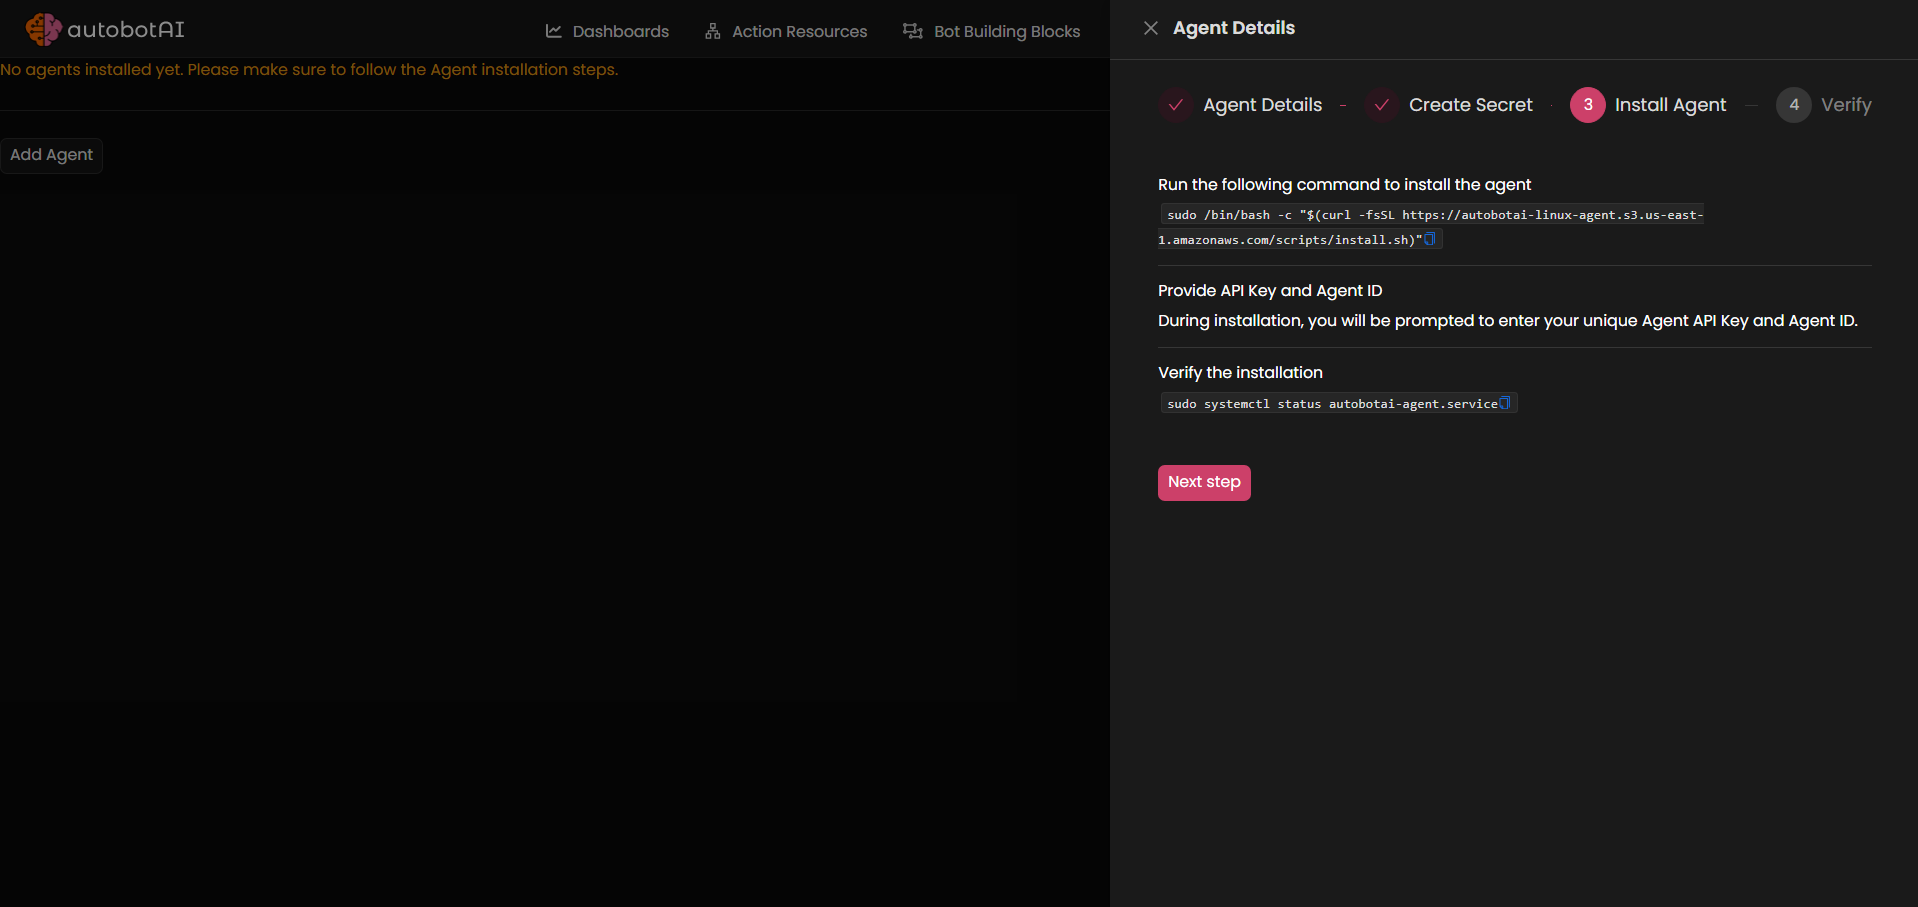
- Click "Next Step." You will receive an agent installation link. Copy this link and paste it into the terminal on your target agent system. For more information, refer to the Prerequisites.
-
Enter Credentials in Terminal
- The installation script will prompt you to enter the API URL, Agent API Key, and Agent ID. Input the details you saved in Step 3.

- The installation script will prompt you to enter the API URL, Agent API Key, and Agent ID. Input the details you saved in Step 3.
-
Verify Installation
- After the installation completes, you can verify the agent service status by running the command:
bashsudo systemctl status autobotAI-agent.service

-
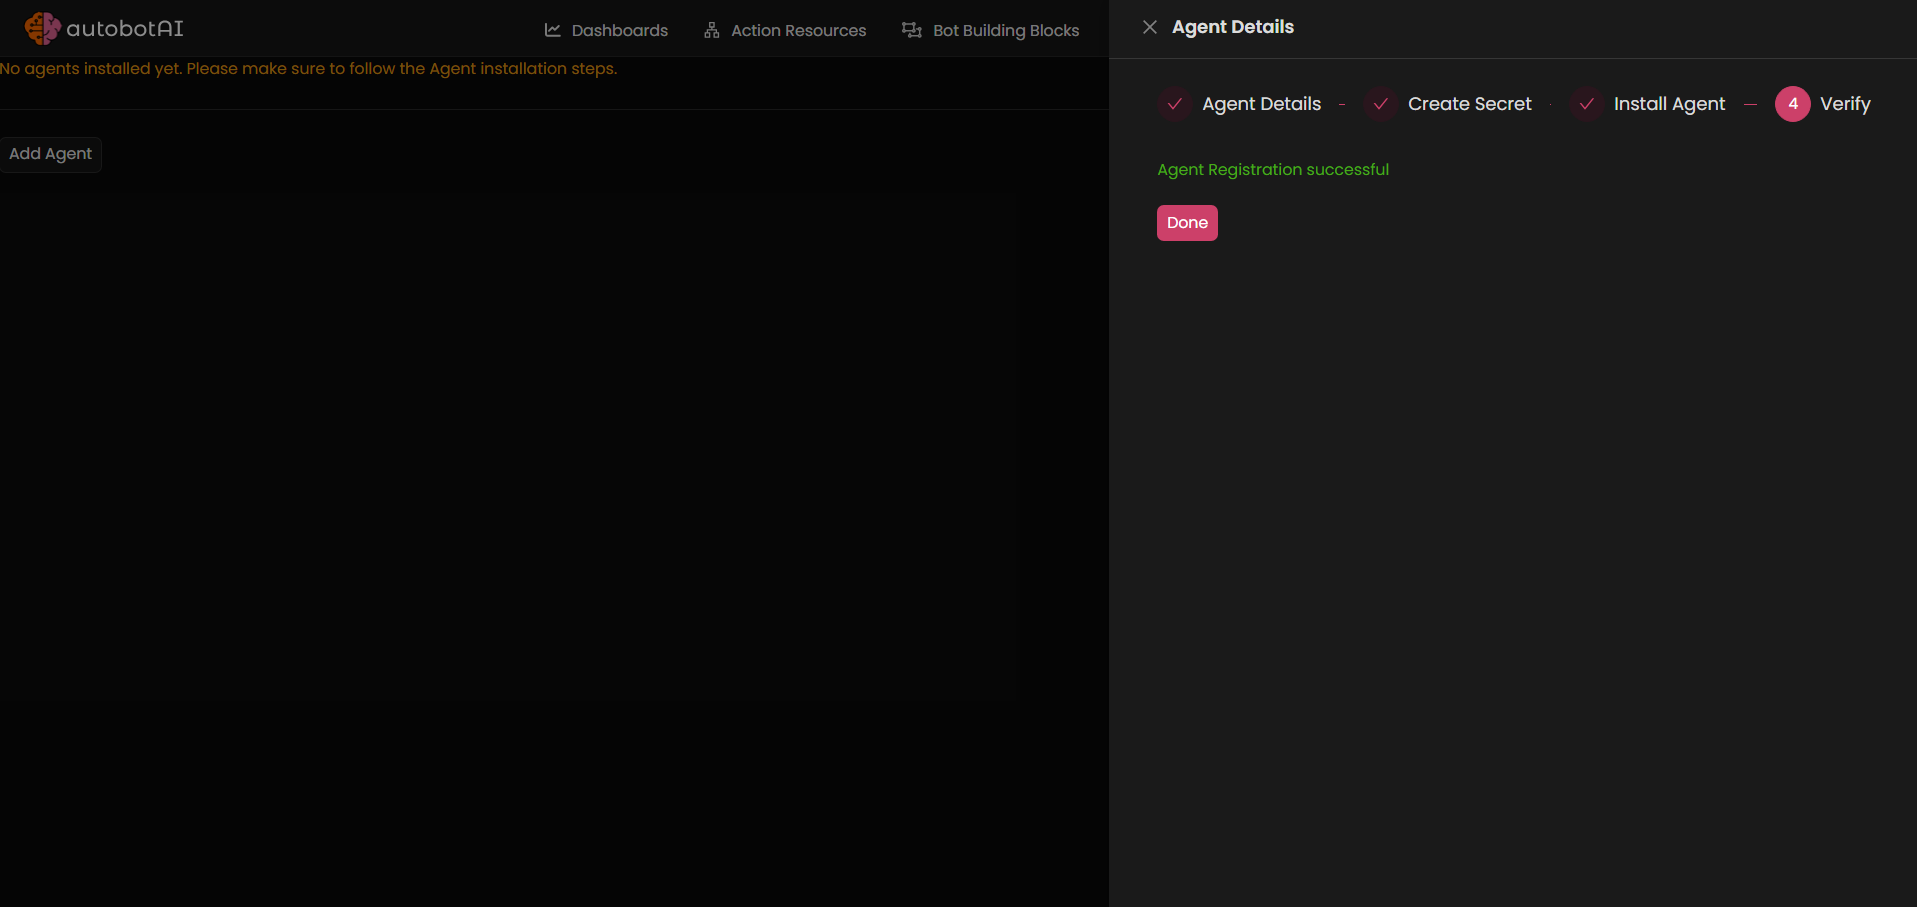
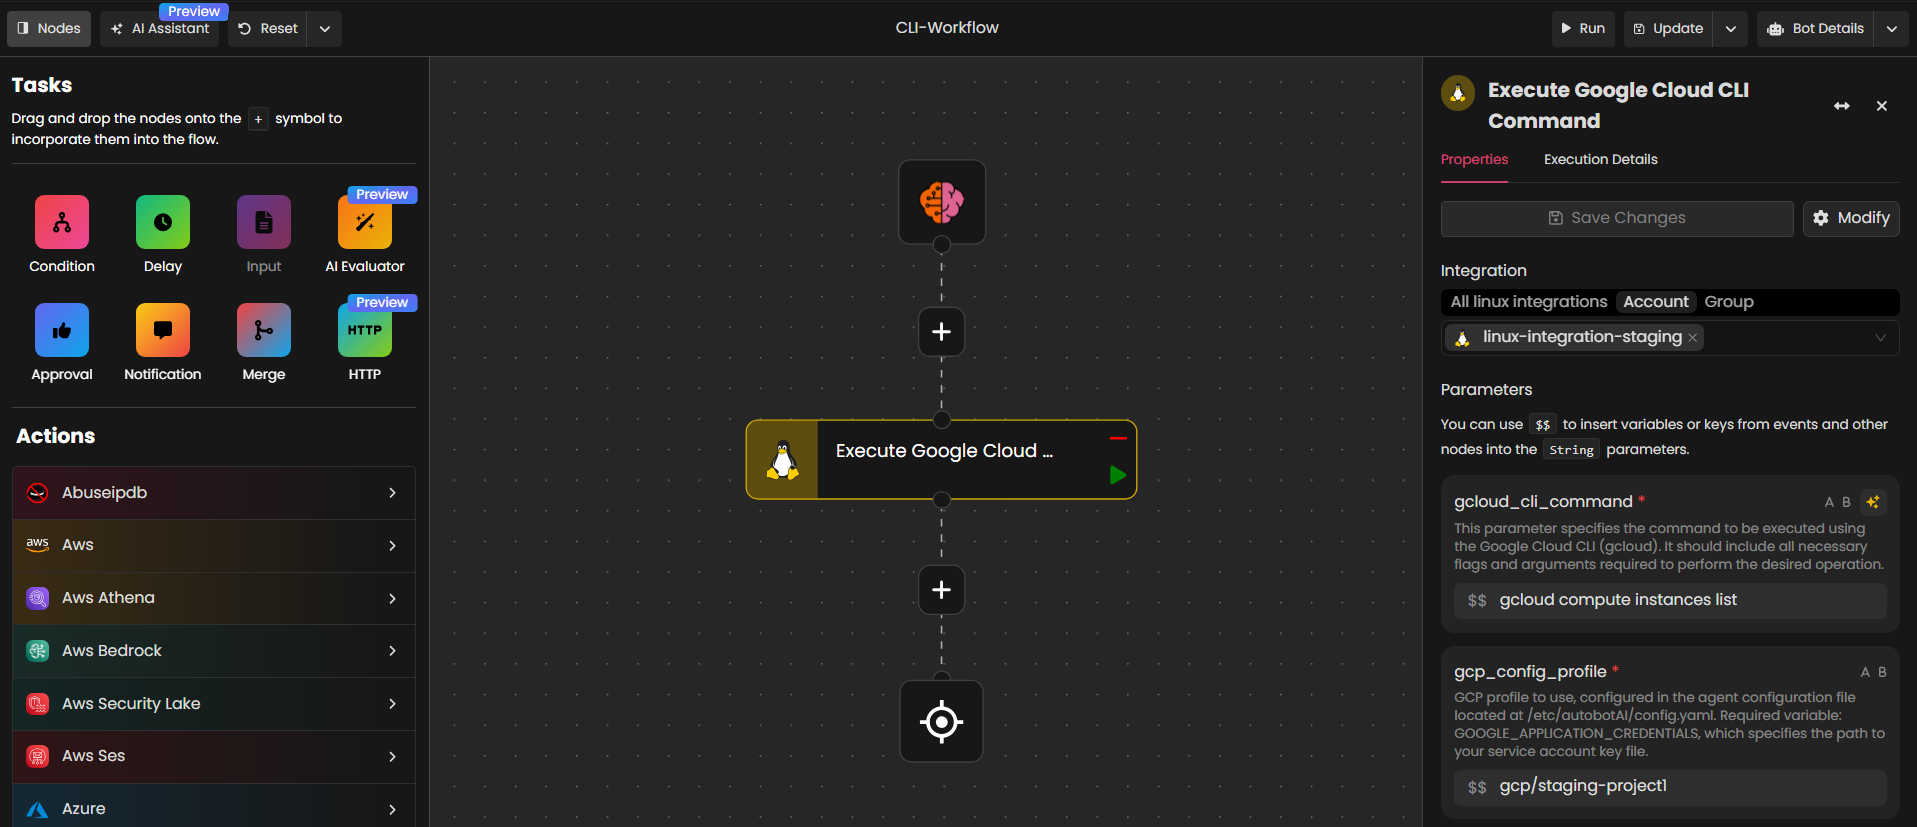
After completing these steps, the agent will be added to the Linux integration, and you will see a message indicating successful agent registration. You can then start using this integration in your automation workflows.
Non-Interactive Installation
If you prefer to install the agent non-interactively, you can execute the following command:
bashsudo /bin/bash -c "$(curl -fsSL https://autobotai-linux-agent.s3.amazonaws.com/scripts/install.sh)" -- \
  --non-interactive \
  --agent-api-url=<YOUR_AGENT_API_URL> \
  --agent-api-key=<YOUR_AGENT_API_KEY> \
  --agent-id=<YOUR_AGENT_ID>
Note: Make sure to replace <YOUR_AGENT_API_URL>, <YOUR_AGENT_API_KEY>, and <YOUR_AGENT_ID> with the values obtained from the agent credentials you generated during the installation process.
Supported Arguments for the Installation Script
| Argument | Description |
|---|---|
--version=vX.Y.Z | Install a specific version of the agent. Must start with v (e.g., v1.2.0) |
--non-interactive | Run installation without any prompts |
--agent-api-url=URL | The API endpoint to register and connect the agent |
--agent-api-key=KEY | Secret API key for authenticating the agent |
--agent-id=ID | Unique ID assigned to the agent during integration setup |
Note: - In --non-interactive mode, all three flags --agent-api-url, --agent-api-key, and --agent-id are required. Missing any of them will cause the script to exit.
Linux Agent Key Components
Action Configuration Profiles File
The Action configuration profiles file is located at /etc/autobotAI/config.yaml. This file serves as the primary configuration hub for the autobotAI agent. It contains profiles and settings required for executing CLI commands for various cloud providers or tools.
Purpose
The purpose of the configuration file is to define environment variables specific to different profiles. Each profile corresponds to a cloud provider or tool, enabling the agent to operate within distinct environments seamlessly.
Usage
To use the configuration file, you can add new profiles under the profiles section. Here’s an example configuration for an AWS profile:
yamlprofiles:
    aws: # "aws" is the cloud provider
        staging: # "staging" is the profile name
            AWS_ACCESS_KEY_ID: "your_staging_access_key"
            AWS_SECRET_ACCESS_KEY: "your_staging_secret_key"
            AWS_REGION: "your_staging_region"
        production: # "production" is another profile name
            AWS_ACCESS_KEY_ID: "your_production_access_key"
            AWS_SECRET_ACCESS_KEY: "your_production_secret_key"
            AWS_REGION: "your_production_region"
NOTE: Make sure to replace the placeholder values with actual credentials for your cloud environments. When adding other providers or tool variables, follow the same schema.
Using Configuration Profiles in Actions
When using Linux actions that require a configuration profile, specify the profile in the format cloud_provider/profile_name. For example, in the Execute Terraform Configuration action, you would specify the profile in the config_profile parameter as aws/staging. This allows the agent to retrieve the correct environment variables associated with the specified profile during the execution of the action
Linux Actions
Linux actions are predefined operations executed via the autobotAI Linux Agent, allowing users to perform various command-line interfaces and scripts on Linux systems within automation workflows. These actions enable seamless integration with cloud providers and automation tools, making resource management more efficient.
Linux Actions are powered by AI, allowing you to leverage AI capabilities to streamline tasks like generating AWS CLI commands or crafting Bash scripts and many more.
We currently support the following Linux actions:
- Execute AWS CLI Command
- Execute Azure CLI Command
- Execute Google Cloud CLI Command
- Execute Terraform Configuration
- Execute Ansible Playbook
- Execute Local Ansible Playbook
- Execute Kubectl Command
- Execute Kubernetes Manifest
- Execute Bash Script
Agent Credentials and Configuration
The agent stores both credentials and configuration files under the /root/.autobotAI/ directory. These files are used to authenticate and manage how the agent operates.
Credentials Location
- Path:
/root/.autobotAI/credentials - Content: Contains authentication details:
AGENT_API_URL: The URL the agent connects to.AGENT_API_KEY: API key for authentication.AGENT_ID: Unique identifier of the agent.
🔒 Do not manually modify this file. It is managed automatically by the agent.
Config File Location
- Path:
/root/.autobotAI/config - Content: Internal agent settings:
AGENT_VERSION: Installed agent version.AGENT_BUILD_CHANNEL: Release type (Stable,Dev, etc.).AGENT_BUILD_ARCH: System architecture (amd64,arm64, etc.).AGENT_AUTO_UPDATE: Whether auto-update is enabled (TrueorFalse).
⚙️ You should only manually modify AGENT_AUTO_UPDATE if you want to enable or disable auto-updates. Do not modify other values in this file.
Agent Logging
The logs generated by the autobotAI agent are stored in the directory /var/log/autobotAI. This directory contains all log files related to the agent's operations, including error messages, informational logs, and other runtime information.
Log Files Location
- Path:
/var/log/autobotAI - Contents: The logs provide insights into the agent's activities and can be useful for troubleshooting and monitoring its performance.
Accessing Logs
You can view the logs using standard command-line tools. For example, to view the latest log entries, you can use:
bashtail -f /var/log/autobotAI/*.log
This command will display real-time log updates as they occur.
Auto-Update Logs
When auto-update is enabled, update script logs are saved to:
bash/var/log/autobotAI/auto_update_<YYYY-MM-DD>.log
To view the latest auto-update log:
bashtail -f /var/log/autobotAI/auto_update_$(date +%F).log
Changing Agent Log Level
-
Open the Configuration File
Edit~/.autobotAI/config. -
Update Log Level
ModifyAGENT_LOG_LEVELtoDEBUG,INFO,WARNING,ERROR, orCRITICAL. -
Save Changes
Exit and save the file. -
Restart the Agent
bashsudo systemctl restart autobotAI-agent
Note: The DEBUG log level may log sensitive data such as credentials, tokens, or internal application state.
Log Rotation
The agent uses time-based log rotation to manage log file size and retention:
- Rotation Frequency: Daily at midnight
- Retention Policy: Keeps up to 30 backup log files
Older log files beyond the last 30 days are automatically deleted. This ensures logs remain manageable without manual intervention.
Agent Service Commands
| Command | Description |
|---|---|
sudo systemctl status autobotAI-agent | Check the status of the autobotAI agent. |
sudo systemctl start autobotAI-agent | Start the autobotAI agent. |
sudo systemctl stop autobotAI-agent | Stop the autobotAI agent. |
sudo systemctl restart autobotAI-agent | Restart the autobotAI agent. |
sudo journalctl -f -u autobotAI-agent | Follow the logs for the autobotAI agent in real-time. |
Update Agent
To update the autobotAI linux agent and ensure it is running the latest version, run the following command:
bashsudo /bin/bash -c "$(curl -fsSL https://autobotai-linux-agent.s3.amazonaws.com/scripts/update.sh)"
Supported Arguments for the Update Script
| Argument | Description |
|---|---|
--version=vX.Y.Z | Install a specific version (use if needed or latest has issues) |
--non-interactive | Run in non-interactive mode (no prompts) |
--enable-auto-update=boolean | Enable or disable auto-updates (true or false) |
ℹ️ Use -- before the first argument when using curl | bash.
Example: sudo bash -c "$(curl -fsSL ...)" -- --version=v1.2.1
Agent Auto-Update
The auto-update feature allows the autobotAI Linux Agent to automatically fetch and apply newer versions when they become available—without manual intervention.
This behavior is controlled by the AGENT_AUTO_UPDATE flag stored in the agent's config file at:
/root/.autobotAI/config
You can enable or disable this feature in two ways:
- By setting the flag manually in the config file:
AGENT_AUTO_UPDATE=TrueorFalse - By passing the
--enable-auto-update=true|falseargument during an update (not during initial install).
⚠️ To enable auto-update, you must use the update script or edit the config file directly.
ℹ️ For where auto-update logs are stored, refer here.
Uninstall/Remove Agent
To uninstall the autobotAI linux agent and remove all its associated data, run the following command:
bashsudo /bin/bash -c "$(curl -fsSL https://autobotai-linux-agent.s3.amazonaws.com/scripts/uninstall.sh)"
